在Windows10搭建yolov5的开发环境,简单训练模型,以及脱离深度学习环境部署模型
新手记录搭建yolo开放环境
软件安装
安装显卡驱动
根据电脑配置安装对应的显卡驱动,没有显卡不安装也行
安装Anaconda
由于深度学习环境的各种依赖特别繁琐和复杂,用Anaconda来管理深度学习环境会比较方便,相当于在电脑里面划分出一块空间单独给深度学习用,无论怎么折腾它都不会影响到电脑本来的开发环境,可以避免很多不必要的麻烦
打开Anaconda官网https://www.anaconda.com/products/distribution#Downloads,下载相应安装文件安装即可
注意:后续开发环境占用空间非常大,建议不要安装在C盘,并预留50G以上的空间
安装pycharm
python最好用的ide,一开始我用的VSCode,配置起来麻烦,用pycharm简单很多。没啥好说的,官网下载安装即可
环境配置
配置PyTorch
安装PyTorch
安装好Anaconda后打开Anaconda Prompt或者Anaconda Powershell Prompt,Anaconda Powershell Prompt比Anaconda Prompt多了一些Linux下的命令操作,使用上更加方便,用哪个都行。
使用命令查看当前有哪些环境
1 | conda env list |
1 | (base) PS C:\Users\Kepler> conda env list |
默认只有一个base环境,输入命令创建一个新的环境pytorch,询问是否安装的时候,输入y以安装
1 | conda create -n pytorch python=3.8 |
安装完成后应该有两个环境
1 | (base) PS C:\Users\Kepler> conda env list |
输入命令切换环境
1 | conda activate pytorch |
换源加速安装
1 | conda config --add channels https://mirrors.tuna.tsinghua.edu.cn/anaconda/pkgs/free/ |
准备工作做完了,打开PyTorch官网,按下图复制安装命令,不可以复制完整,要不然下载很慢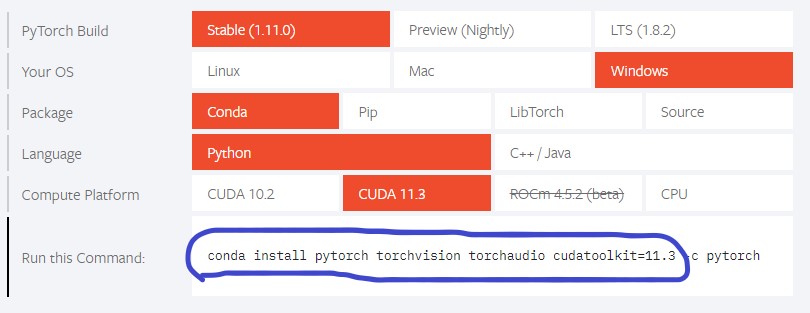
1 | conda install pytorch torchvision torchaudio cudatoolkit=11.3 |
等待安装完成,这里可能会安装失败,多试几次就可以了
验证CUDA、CUDNN
打开pycharm,新建一个工程,复制代码运行
1 | import torch |
输出以下信息则成功安装了CUDA和CUDNN
1 | True |
配置YOLOV5
克隆YOLOV5
从yolov5的仓库下载或克隆一份代码到本地,用pycharm打开工程:
data:
主要是存放一些超参数的配置文件(这些文件(yaml文件)是用来配置训练集和测试集还有验证集的路径的,其中还包括目标检测的种类数和种类的名称)还有一些官方提供测试的图片。如果是训练自己的数据集的话,那么就需要修改其中的yaml文件。但是自己的数据集不建议放在这个路径下面,而是建议把数据集放到yolov5项目的同级目录下面
models:
里面主要是一些网络构建的配置文件和函数,其中包含了该项目的四个不同的版本,分别为是s、m、l、x。从名字就可以看出,这几个版本的大小。他们的检测测度分别都是从快到慢,但是精确度分别是从低到高。这就是所谓的鱼和熊掌不可兼得。如果训练自己的数据集的话,就需要修改这里面相对应的yaml文件来训练自己模型。
utils:
存放的是工具类的函数,里面有loss函数,metrics函数,plots函数等等。
weights:
放置训练好的权重参数。
detect.py:
利用训练好的权重参数进行目标检测,可以进行图像、视频和摄像头的检测。
train.py:
训练自己的数据集的函数。
test.py:
测试训练的结果的函数。
requirements.txt:
这是一个文本文件,里面写着使用yolov5项目的环境依赖包的一些版本,可以利用该文本导入相应版本的包
设置python解释器
设置工程的python解释器为之前在Anaconda中创建的pytorch,在pycharm右下角设置

安装依赖
在yolov5主目录打开终端输入命令安装
1 | pip install -r requirements.txt |
准备数据集
爬图
使用以下代码从百度图库爬取图片,根据需求修改keyword和max_download_images
1 | import os |
数据集打标签
利用labelimg给数据集打标签
安装labelimg
1 | pip install labelimg -i https://pypi.tuna.tsinghua.edu.cn/simple |
准备原始数据
新建如下目录结构
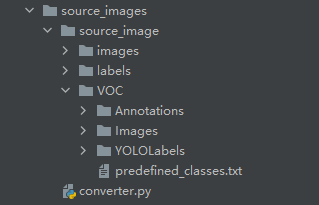
- 按上图新建好文件目录结构和文件
- 将上一步准备的数据复制到source_image/source_image/VOC/Image目录下
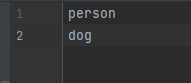
- 在predefined_classes.txt中写入训练class,如person dog
- 复制转换代码到converter.py中
1
2
3
4
5
6
7
8
9
10
11
12
13
14
15
16
17
18
19
20
21
22
23
24
25
26
27
28
29
30
31
32
33
34
35
36
37
38
39
40
41
42
43
44
45
46
47
48
49
50
51
52
53
54
55
56
57
58
59
60
61
62
63
64
65
66
67
68
69
70
71
72
73
74
75
76
77
78
79
80
81
82
83
84
85
86
87
88
89
90
91
92
93
94
95
96
97
98
99
100
101
102
103
104
105
106
107
108
109
110
111
112
113
114
115
116
117
118
119
120
121
122
123
124
125
126
127
128
129
130
131
132
133
134
135
136
137
138
139import xml.etree.ElementTree as ET
import pickle
import os
from os import listdir, getcwd
from os.path import join
import random
from shutil import copyfile
classes = ["person", "dog"]
#classes=["ball"]
TRAIN_RATIO = 80
def clear_hidden_files(path):
dir_list = os.listdir(path)
for i in dir_list:
abspath = os.path.join(os.path.abspath(path), i)
if os.path.isfile(abspath):
if i.startswith("._"):
os.remove(abspath)
else:
clear_hidden_files(abspath)
def convert(size, box):
dw = 1./size[0]
dh = 1./size[1]
x = (box[0] + box[1])/2.0
y = (box[2] + box[3])/2.0
w = box[1] - box[0]
h = box[3] - box[2]
x = x*dw
w = w*dw
y = y*dh
h = h*dh
return (x,y,w,h)
def convert_annotation(image_id):
in_file = open('./source_image/VOC/Annotations/%s.xml' %image_id)
out_file = open('./source_image/VOC/YOLOLabels/%s.txt' %image_id, 'w')
tree=ET.parse(in_file)
root = tree.getroot()
size = root.find('size')
w = int(size.find('width').text)
h = int(size.find('height').text)
for obj in root.iter('object'):
difficult = obj.find('difficult').text
cls = obj.find('name').text
if cls not in classes or int(difficult) == 1:
continue
cls_id = classes.index(cls)
xmlbox = obj.find('bndbox')
b = (float(xmlbox.find('xmin').text), float(xmlbox.find('xmax').text), float(xmlbox.find('ymin').text), float(xmlbox.find('ymax').text))
bb = convert((w,h), b)
out_file.write(str(cls_id) + " " + " ".join([str(a) for a in bb]) + '\n')
in_file.close()
out_file.close()
wd = os.getcwd()
wd = os.getcwd()
data_base_dir = os.path.join(wd, "source_image/")
if not os.path.isdir(data_base_dir):
os.mkdir(data_base_dir)
work_sapce_dir = os.path.join(data_base_dir, "VOC/")
if not os.path.isdir(work_sapce_dir):
os.mkdir(work_sapce_dir)
annotation_dir = os.path.join(work_sapce_dir, "Annotations/")
if not os.path.isdir(annotation_dir):
os.mkdir(annotation_dir)
clear_hidden_files(annotation_dir)
image_dir = os.path.join(work_sapce_dir, "Images/")
if not os.path.isdir(image_dir):
os.mkdir(image_dir)
clear_hidden_files(image_dir)
yolo_labels_dir = os.path.join(work_sapce_dir, "YOLOLabels/")
if not os.path.isdir(yolo_labels_dir):
os.mkdir(yolo_labels_dir)
clear_hidden_files(yolo_labels_dir)
yolov5_images_dir = os.path.join(data_base_dir, "images/")
if not os.path.isdir(yolov5_images_dir):
os.mkdir(yolov5_images_dir)
clear_hidden_files(yolov5_images_dir)
yolov5_labels_dir = os.path.join(data_base_dir, "labels/")
if not os.path.isdir(yolov5_labels_dir):
os.mkdir(yolov5_labels_dir)
clear_hidden_files(yolov5_labels_dir)
yolov5_images_train_dir = os.path.join(yolov5_images_dir, "train/")
if not os.path.isdir(yolov5_images_train_dir):
os.mkdir(yolov5_images_train_dir)
clear_hidden_files(yolov5_images_train_dir)
yolov5_images_test_dir = os.path.join(yolov5_images_dir, "val/")
if not os.path.isdir(yolov5_images_test_dir):
os.mkdir(yolov5_images_test_dir)
clear_hidden_files(yolov5_images_test_dir)
yolov5_labels_train_dir = os.path.join(yolov5_labels_dir, "train/")
if not os.path.isdir(yolov5_labels_train_dir):
os.mkdir(yolov5_labels_train_dir)
clear_hidden_files(yolov5_labels_train_dir)
yolov5_labels_test_dir = os.path.join(yolov5_labels_dir, "val/")
if not os.path.isdir(yolov5_labels_test_dir):
os.mkdir(yolov5_labels_test_dir)
clear_hidden_files(yolov5_labels_test_dir)
train_file = open(os.path.join(wd, "yolov5_train.txt"), 'w')
test_file = open(os.path.join(wd, "yolov5_val.txt"), 'w')
train_file.close()
test_file.close()
train_file = open(os.path.join(wd, "yolov5_train.txt"), 'a')
test_file = open(os.path.join(wd, "yolov5_val.txt"), 'a')
list_imgs = os.listdir(image_dir) # list image files
prob = random.randint(1, 100)
print("Probability: %d" % prob)
for i in range(0,len(list_imgs)):
path = os.path.join(image_dir,list_imgs[i])
if os.path.isfile(path):
image_path = image_dir + list_imgs[i]
voc_path = list_imgs[i]
(nameWithoutExtention, extention) = os.path.splitext(os.path.basename(image_path))
(voc_nameWithoutExtention, voc_extention) = os.path.splitext(os.path.basename(voc_path))
annotation_name = nameWithoutExtention + '.xml'
annotation_path = os.path.join(annotation_dir, annotation_name)
label_name = nameWithoutExtention + '.txt'
label_path = os.path.join(yolo_labels_dir, label_name)
prob = random.randint(1, 100)
print("Probability: %d" % prob)
if(prob < TRAIN_RATIO): # train dataset
if os.path.exists(annotation_path):
train_file.write(image_path + '\n')
convert_annotation(nameWithoutExtention) # convert label
copyfile(image_path, yolov5_images_train_dir + voc_path)
copyfile(label_path, yolov5_labels_train_dir + label_name)
else: # image dataset
if os.path.exists(annotation_path):
test_file.write(image_path + '\n')
convert_annotation(nameWithoutExtention) # convert label
copyfile(image_path, yolov5_images_test_dir + voc_path)
copyfile(label_path, yolov5_labels_test_dir + label_name)
train_file.close()
test_file.close()
使用labelimg打标签
在source_image/source_image/VOC/目录下打开终端,输入命令启动labelimg
1 | labelimg Images predefined_classes.txt |
注意设置目标格式
标签格式转换
运行source_image/source_image/目录下coverter.py,将VOC格式标签xml文件转换成yolo格式标签txt文件,并将数据划分成训练数据和验证数据
转换后文件中会被填充入数据

训练模型
获取预训练权重
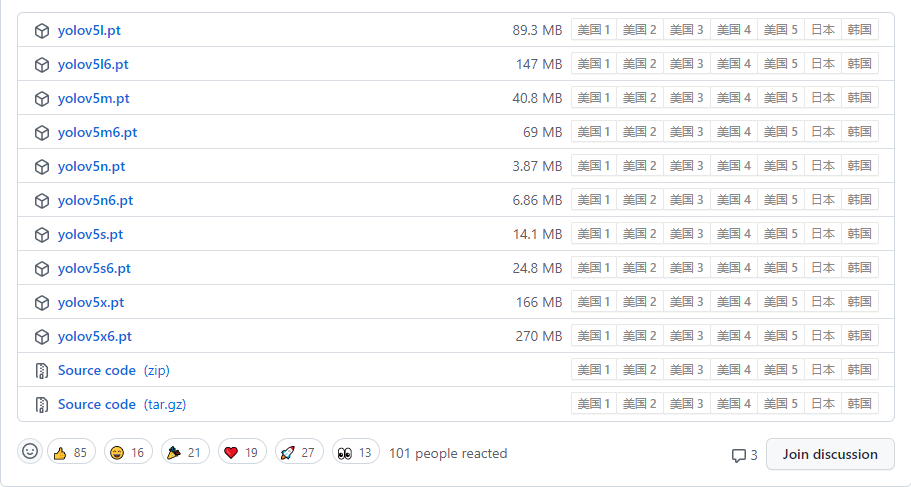
一般为了缩短网络的训练时间,并达到更好的精度,我们一般加载预训练权重进行网络的训练。而yolov5的5.0版本给我们提供了几个预训练权重,我们可以对应我们不同的需求选择不同的版本的预训练权重。通过如下的图可以获得权重的名字和大小信息,可以预料的到,预训练权重越大,训练出来的精度就会相对来说越高,但是其检测的速度就会越慢。预训练权重可以通过这个网址进行下载,本次训练自己的数据集用的预训练权重为yolov5s.pt
修改配置文件
拷贝数据集
将之前准备好的数据集拷贝到yolov5主目录中
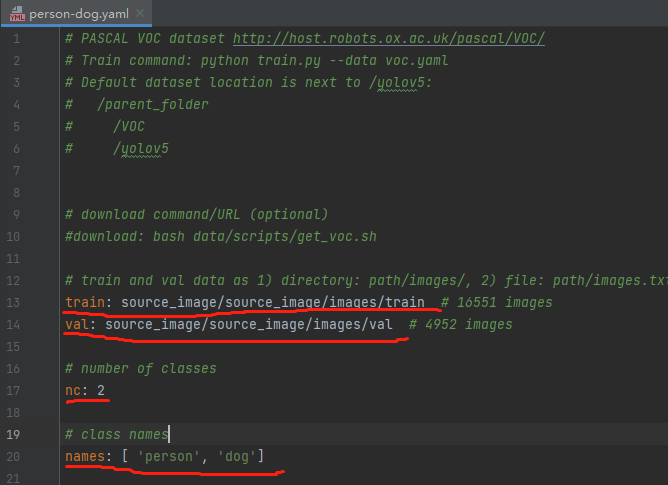
修改voc.yaml
找到data目录下的voc.yaml文件,将该文件复制一份,将复制的文件重命名,最好和项目相关,这样方便后面操作。我这里修改为person_dog.yaml。该项目是对人和狗的识别
按图片修改person-dog内容(根据自己的实际情况修改)
修改模型配置文件
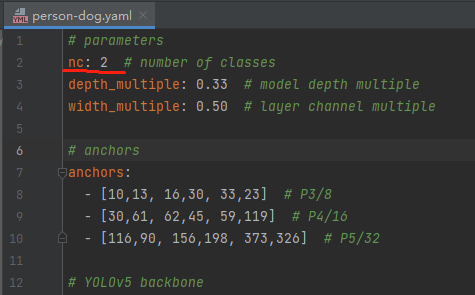
找到models目录下的yolov5s.yaml文件,将该文件复制一份,将复制的文件重命名,最好和项目相关,这样方便后面操作。我这里修改为person_dog.yaml。该项目是对人和狗的识别
按图片修改内容,只需要改nc的值即可(根据自己的实际情况修改)
修改训练参数
打开train.py文件,修改以下几个参数
1 | parser.add_argument('--weights', type=str, default='weights/yolov5s.pt', help='initial weights path') #预训练权重文件 |
改完后运行train.py开始训练
如遇虚拟内存爆了,将utils路径下datasets.py的num_workers改为0
tensorbord
运行
1 | tensorboard --logdir=runs/train |
点击生成的网址即可跳转浏览器查看训练过程数据
推理验证
训练结束后会在yolo主目录生成run文件夹,权重文件在run/train/exp/weights/下,best.pt是最好的权重文件,last.pt是最后一轮训练的权重文件。
打开主目录下的detect.py文件,修改设置进行推理测试。
传入权重文件路径,就是刚刚训练的结果
1 | parser.add_argument('--weights', nargs='+', type=str, default='runs/train/exp/weights/best.pt', help='model.pt path(s)') |
传入要测试的图片路径,改为’0’则是打开摄像头
1 | parser.add_argument('--source', type=str, default='person.jpg', help='source') |
嵌入式部署基础
在进行嵌入式部署的时候,为了简化依赖,需要将pt文件转为onnx文件进行推理,只需要安装opencv就可以完成推理
pt、pth、onnx转换
pt转pth代码
1 | import torch |
pth转onnx代码
1 | 见目录 |
使用OpenCV推理ONNX
1 | import cv2 |
参考链接:
- https://blog.csdn.net/didiaopao?type=blog (主要参考对象,yolov5配置全网最详细保姆级教程)
- https://blog.csdn.net/nihate/article/details/112731327 (opencv推理)
- https://github.com/ultralytics/yolov5

